


When you compare it with TikTok and Instagram reels, a real estate Facebook page may feel like a thing from the past. However, Facebook for realtors is still incredibly important because the platform attracts an audience more likely to buy and sell real estate. Your Facebook page will display your brand more clearly than other platforms, with opportunities to link to your website, display a call to action, and show your headshot, logo, and other marketing materials. To help you set up a Facebook business page, I’ve created this step-by-step guide with tips to maximize your reach.
- 1. Set Up a Meta Business Account
- 2. Create a New Business Page
- 3. Choose Your Page Name & Category
- 4. Add Your Contact Information
- 5. Add Your Profile Photo & Cover Photo
- 6. Choose Your Call to Action
- 7. Connect your Facebook & WhatsApp
- 8. Invite Your Friends
- 9. Manage Notifications
- 10. Congratulations!
- Tips for Your Facebook Realtor Page
- Real Estate Agent Facebook Page Examples
- Frequently Asked Questions (FAQs)
- Bringing It All Together
1. Set Up a Meta Business Account
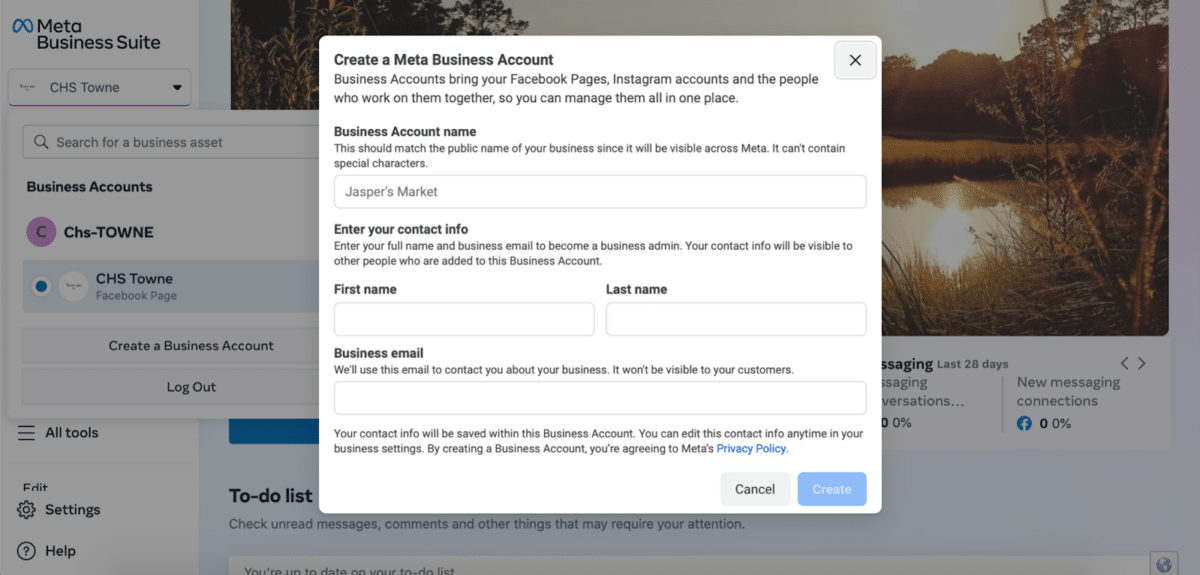
The first step to creating a real estate agent Facebook page is to log into Facebook. You can proceed to the next step if you already have a personal account. If not, that’s your first step. Go to Meta Business Suite from your Facebook account and click Get Started. It’s free, easy, and quick; all you need to add is your name, business name, and email.
2. Create a New Business Page
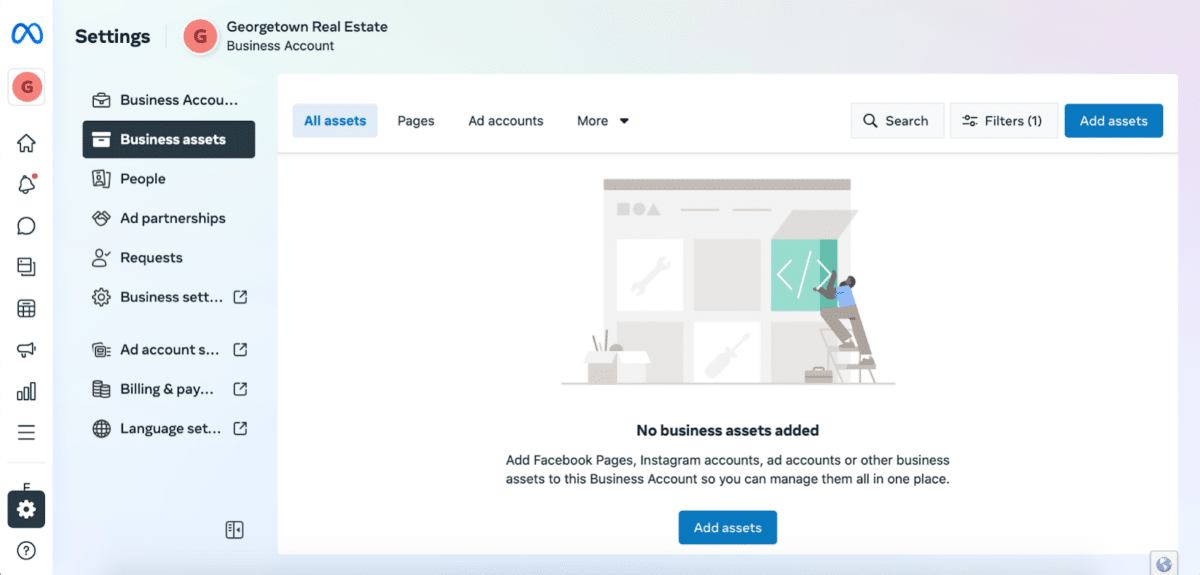
At this point, you have only created a business account within the Meta Business Suite universe, and it’s time to create your actual pages within that account.
You can create a business account from your profile if you already have a Facebook page or business account. Click on your profile image in the top right corner of your Facebook feed and go to “See All Profiles” or “See All Pages.” From here, a button on the left side of the page will say “Create a New Page.”
3. Choose Your Page Name & Category
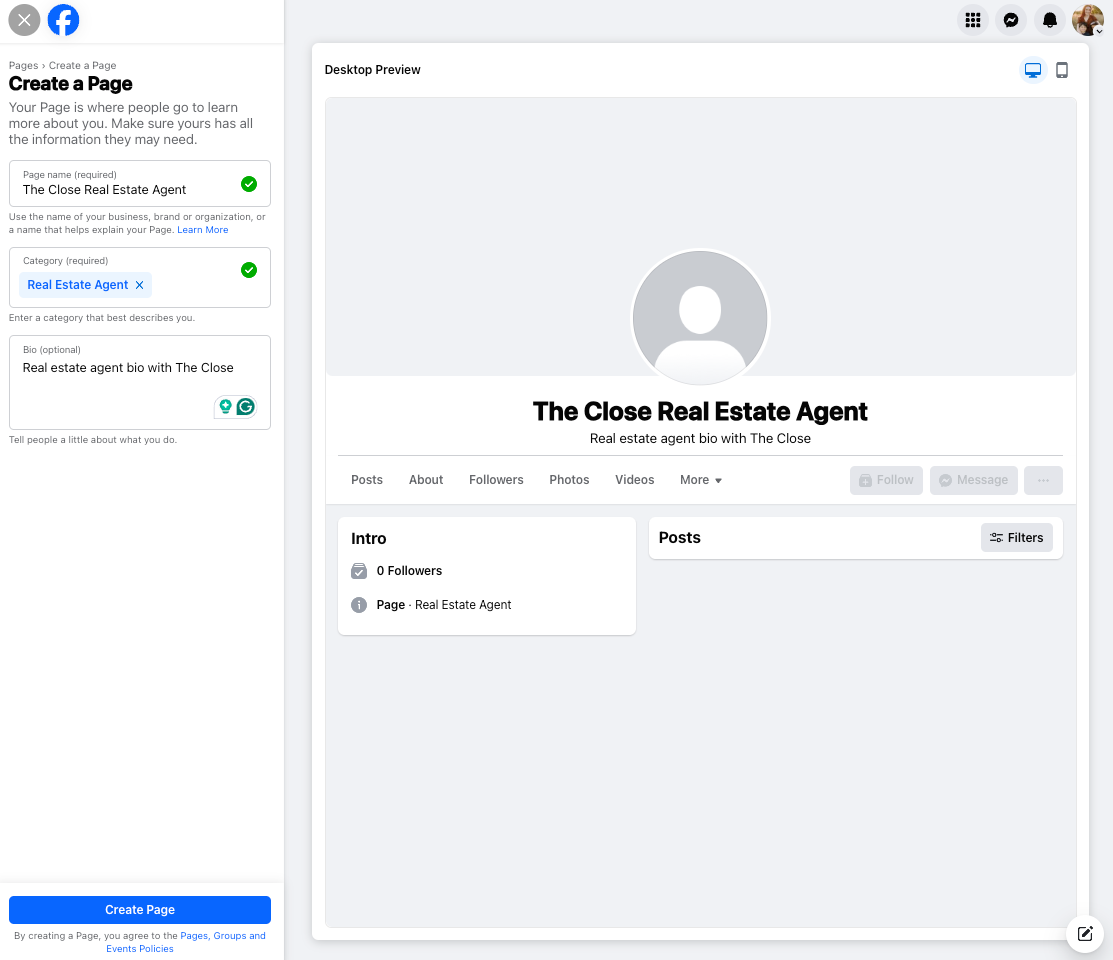
This section is where you’ll fill in the basics, like your page name, category, and real estate agent bio. The bio section can be up to 130 characters, and Facebook will show you a sample page on the right side of the screen. Remember, your Facebook realtor page should be unique to you, so test out different names and bios until you find something that fits your brand.
When choosing your category, type “real estate” and select the most fitting for your business. You’ll see many options, like real estate agent, developer, company, appraiser, and real estate service. Once you’re done filling in all the necessary information, you can click on “Create page.”
4. Add Your Contact Information
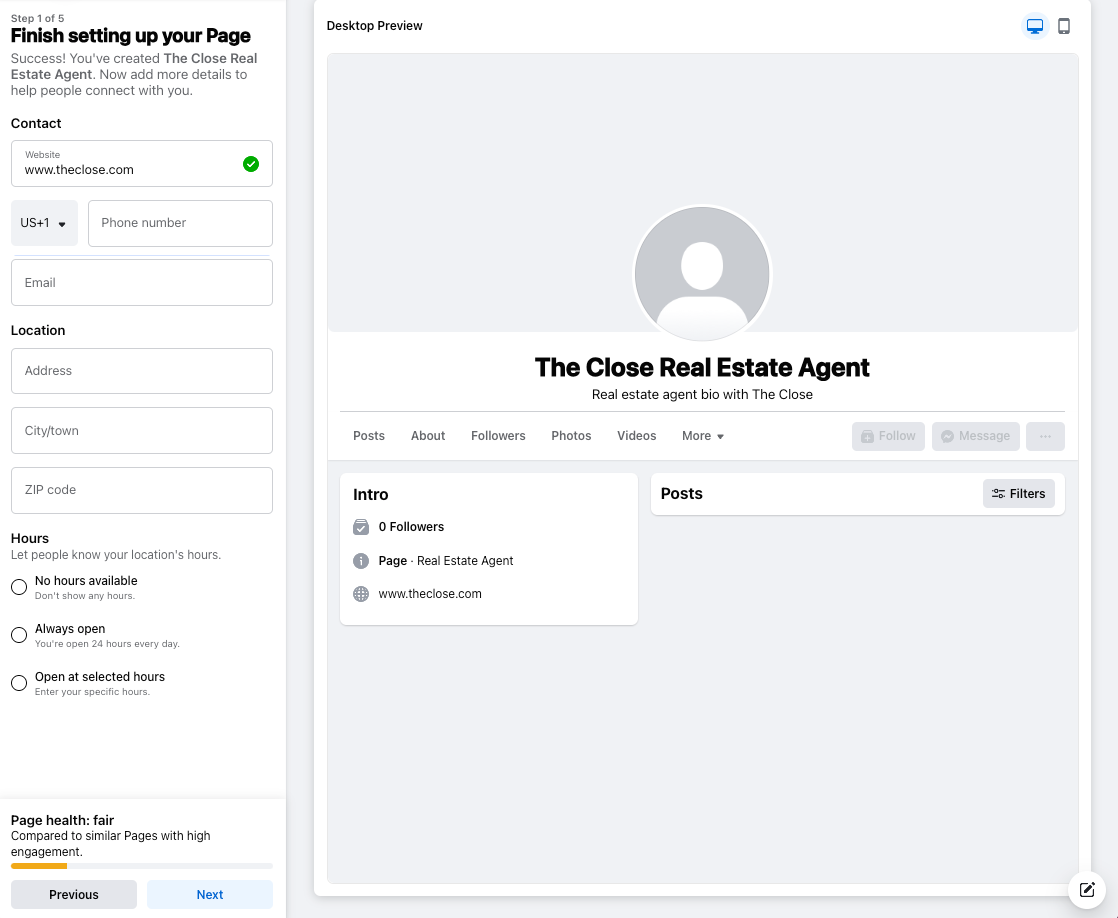
The next thing you’ll need to do is add your contact information so that people will know how to contact you. Add in your website, email address, phone number, location information, and hours of operation.
This is the first step where you’ll notice a “page health score” on the bottom left. Facebook shows you this to help you optimize your page for users. As you continue to develop your Facebook page, it will prompt you to complete tasks and add more value to users.
5. Add Your Profile Photo & Cover Photo
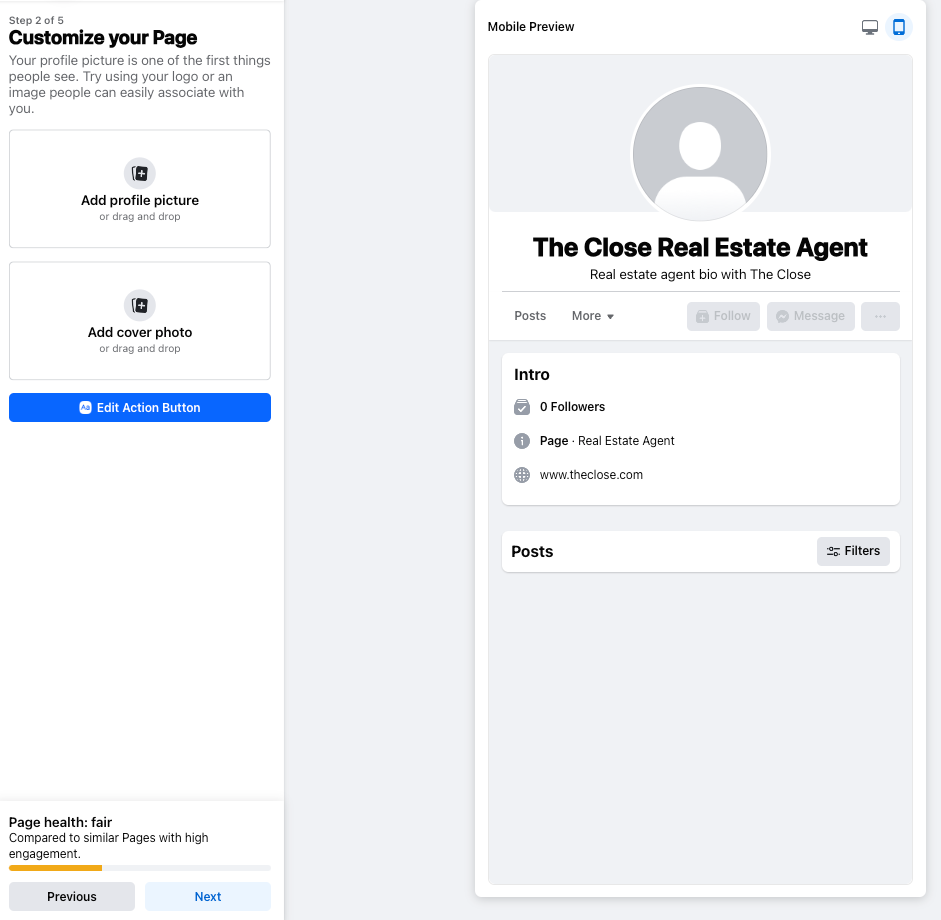
Now that you have a framework, it’s time to add some visuals to your page. Your profile photo can be your personal realtor headshot or the logo of the real estate agency you work for. Remember, your profile picture should be at least 110×110 pixels and displayed as a circle.
Once you’ve uploaded a profile photo, click on the camera to upload your cover image. An excellent Facebook cover photo attracts attention, complements your profile picture, and tells people what type of real estate you sell. For example, a cover photo featuring a city skyline might be a good option if you sell real estate in the big city.

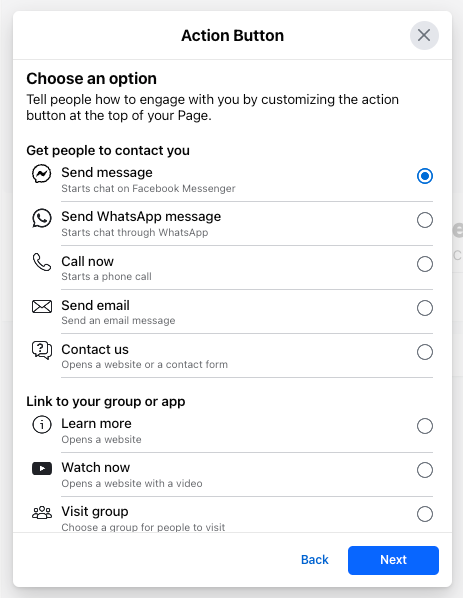
6. Choose Your Call to Action
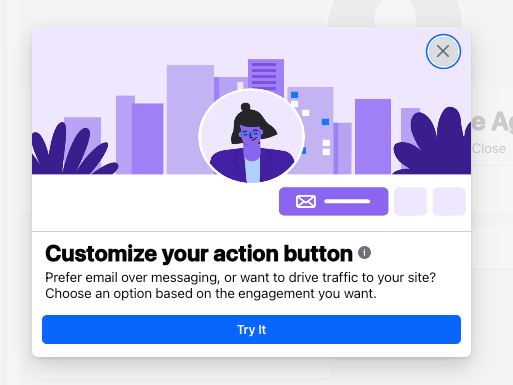
When you customize your page, you’ll see an “Edit Action Button.” This feature allows you to choose your call to action (CTA). A CTA is incredibly important because it prompts Facebook page visitors with the next step and is key for generating leads.
You’ll see many different CTA options, but the best choices for realtors are as follows:
- Send message (starts a Facebook messenger chat)
- Send WhatsApp message (starts a chat through WhatsApp)
- Call now (starts a phone call)
- Send email (sends an email)
- Contact us (opens a website, landing page, or contact form)
- Learn more (opens a website)
7. Connect your Facebook & WhatsApp

Next, the Facebook setup system will prompt you to connect your page to WhatsApp. This integration is an optional step, but I recommend using any tools to ensure people can contact you. WhatsApp is a great option if you don’t want to use your personal phone number but still want to call and text potential clients. It’s also ideal for realtors with an international audience, like those relocating to the States because it allows international calls over Wi-Fi.
8. Invite Your Friends

This is the point in setting up your page where Facebook will prompt you to invite your friends. Of course, this step is optional, but it’s a highly recommended social media marketing strategy to connect with every person in your sphere of influence online. However, you may choose to wait to invite your friends until after your business page is complete and has some content published.
9. Manage Notifications
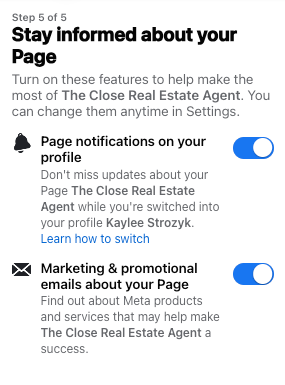
When potential leads or clients message you on Facebook, you’ll get the best response rates and conversion rates when you reply quickly. If you wait just a few hours, they may not think about real estate anymore, and your response may fall through the cracks.
To stay on top of your communications, make sure you have your notifications on so you see them as soon as someone “likes” your page, comments on a post, or reaches out via messenger with a question. You can access your notifications by clicking on the bell icon in the settings menu.
10. Congratulations!
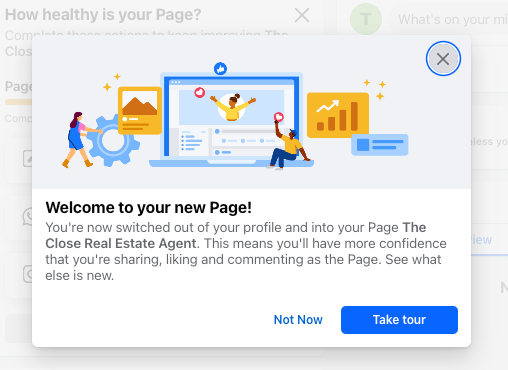
You’ve done it—you now have a ready-to-use realtor Facebook page! However, just having a Facebook page won’t move the needle in your business; using Facebook for realtors requires consistent time and effort. You’ll need to publish content on your page and test out different types of posts, ads, and real estate videos to see which performs best.
Tips for Your Facebook Realtor Page
According to the National Association of Realtors, Facebook is the most used social media network for realtors, and is used by 87% of agents. Having your business page up is just the first step! Next, you must consistently ensure it’s optimized with the right automation and an effective content strategy.
Here are a few additional tips to make sure you’re maximizing your real estate Facebook page:
Tip 1: Create an @Username

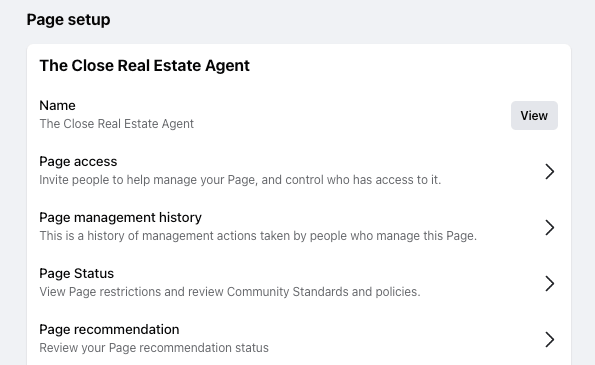

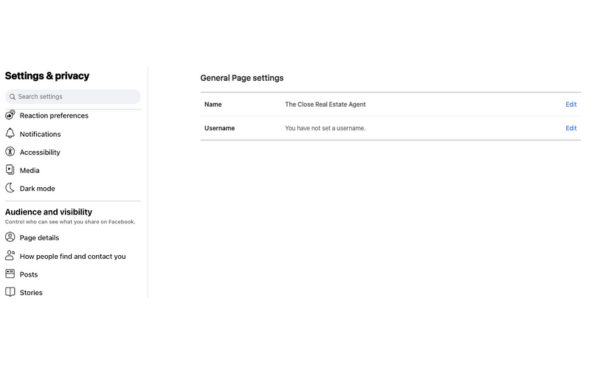
Facebook won’t automatically prompt you to take this step, but it’s a good way to make it easy for people to find your business page. Your @username will become your Facebook page URL, which makes it easy for you and others to share your Facebook link. For example, my sample page’s URL might be facebook.com/thecloserealestate.
Go to Settings on your business page and click on Page Setup. From there, click on Name and then View. This section is where you’ll be able to edit your username. Ensure the username matches your business page name and is easy to remember and type.
Tip 2: Assess Your Personal Brand
When you start any new social media strategy, it’s important to step back and make sure all of your branding elements are in order. In particular, your cover photo, profile photo, bio, contact information, and recent posts are all easily visible to viewers on Facebook. Make sure you have a clear logo that shows your business name, a bio that communicates your specialty, and a crisp, professional logo.
Tip 3: Customize Your Page Sections
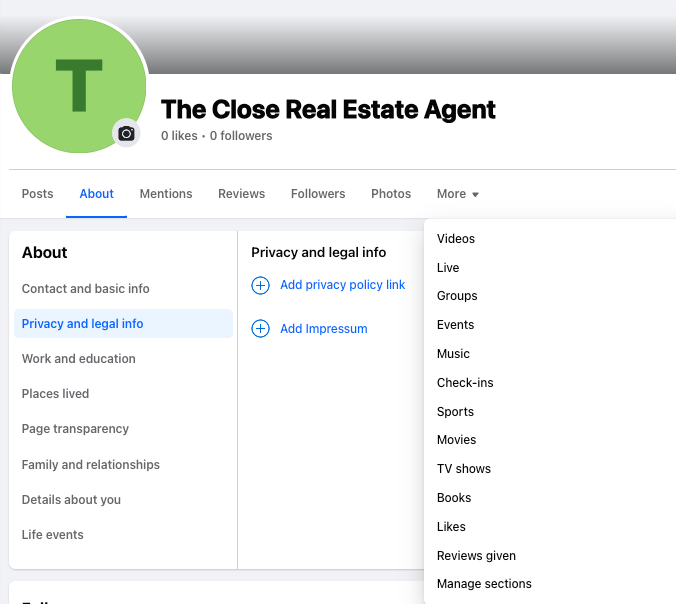
Your Facebook page acts similar to a website, with a menu bar at the top of all business pages. Make sure to customize your pages since some are irrelevant and clutter your page. Choose only the pages you are actually using, like photos, groups, and “about.” Many of these pages are irrelevant to real estate, so having them live will just confuse potential leads.
Tip 4: Manage Your Business Page’s Health
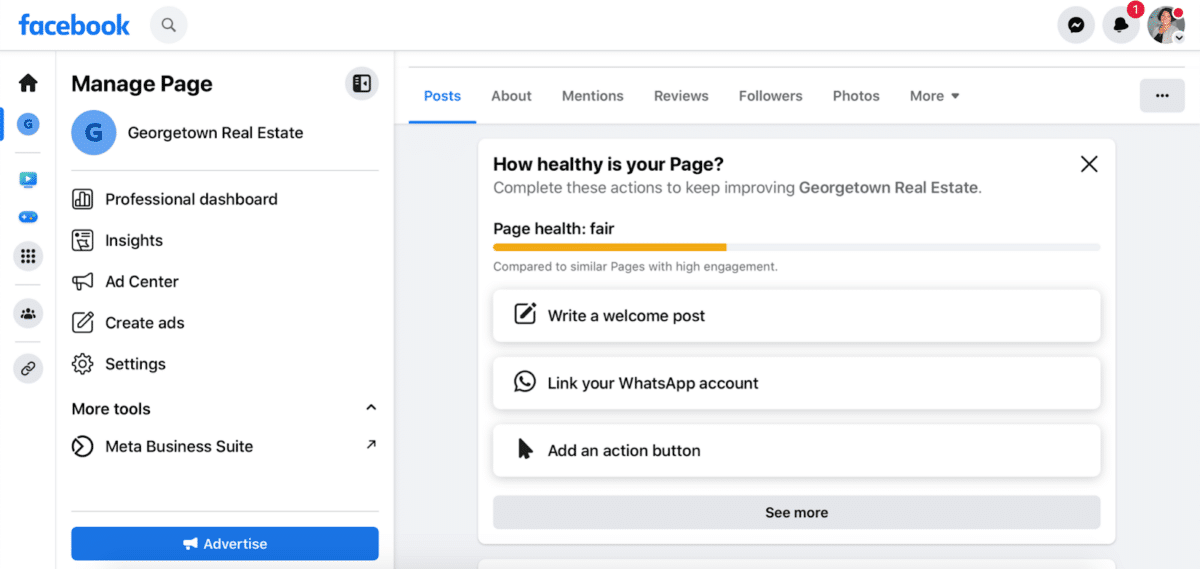
Meta has various tools for monitoring and evaluating the success of your page, planning content, and posting ads. One of those tools is the “page health” score, which will show you how well your page is optimized for traffic and new leads. It will also prompt you with tasks to improve your page, like publishing new content.
If you need help creating posts for your Facebook page, start with our 30-day content creation challenge.
Tip 5: Plan & Publish Content
The content you share will be what ultimately drives the success of your realtor Facebook page. It might be overwhelming to plan and publish content initially, but there are so many resources and tools from The Close and Meta. Start using real estate social media templates and look for the Meta content planner, making it easy to plan and schedule content across Facebook and Instagram. Read our list of real estate social media post ideas for even more inspiration.
Tip 6: Set Up a Facebook Messenger Auto-reply
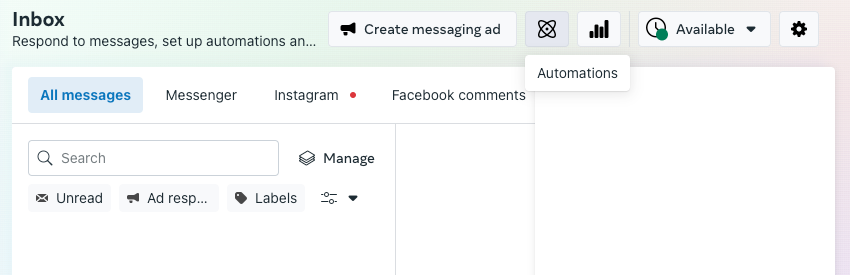
Facebook makes it easy never to miss a new message with an auto-reply feature. When a new lead messages you, you can create a custom message that will automatically be sent to them instantly. This can help them feel like you’re in contact with them even when they message you in the middle of the night or during a meeting.
To set up an auto-reply, go to your Inbox. Find the square button for Automation. Here is where you can set your auto-replies and responses.
To further connect and nurture new leads from Facebook for real estate agents, try using Market Leader’s Network Boost. It’s a social media advertising platform that automatically sends new leads to the Market Leader CRM, where they receive email and text drip campaigns to keep them engaged. In fact, the Network Boost program can be entirely automated by the Market Leader team to multiply your reach on Facebook without any extra time. Check out our Market Leader review to get more details.
Tip 7: Evaluate Page Performance Data
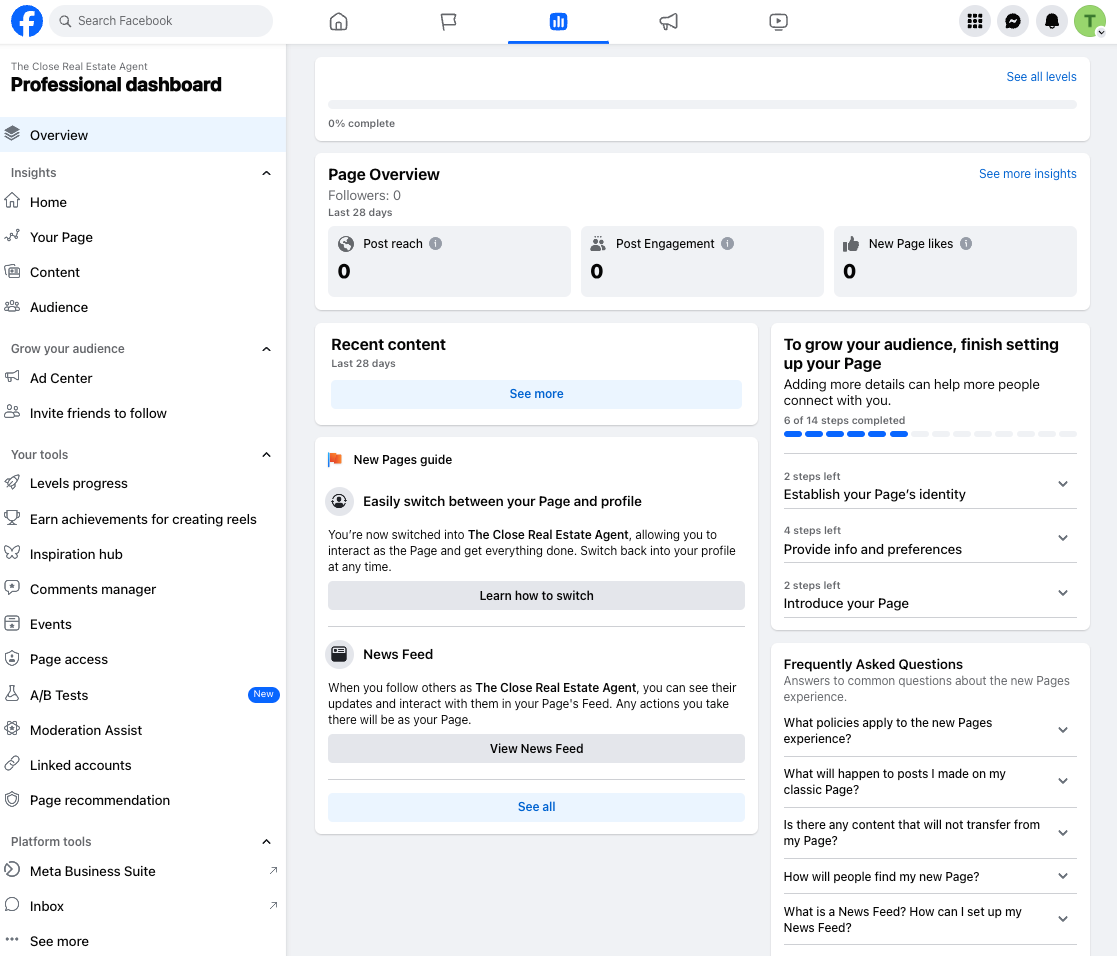
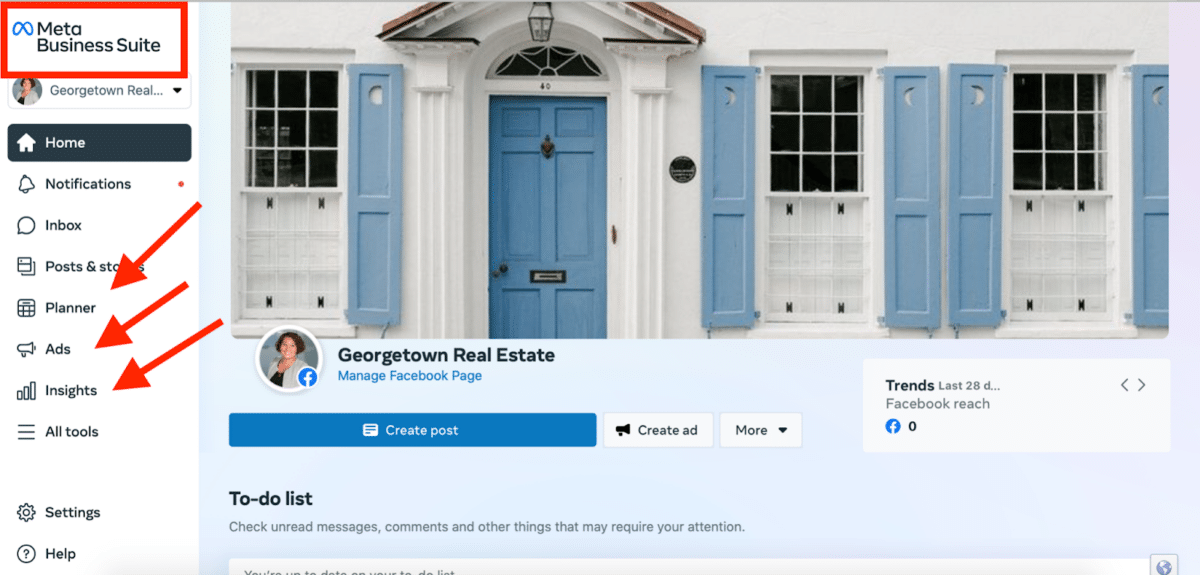
It’s important to evaluate the performance of every marketing channel you use, and the Meta Business Suite makes this really easy. Your professional dashboard will show what content is performing the best, along with each post’s reach and engagement numbers. You can view new “likes,” comments, reactions, shares, and more. Take full advantage of the tips for improving your page.
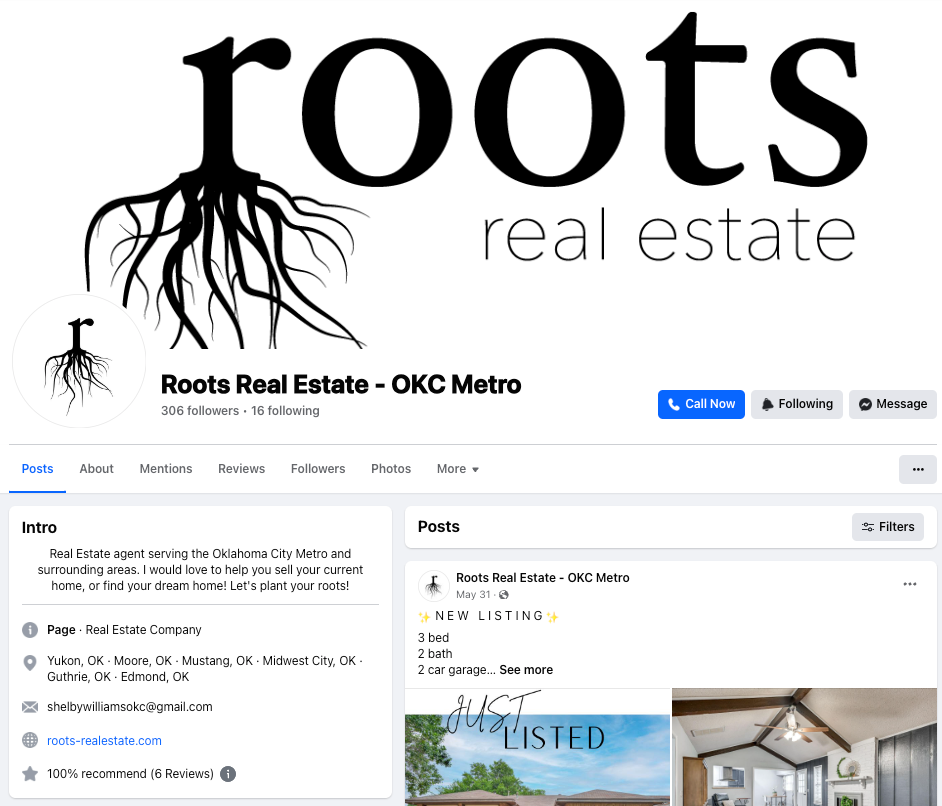
Real Estate Agent Facebook Page Examples
One of the best ways to get ideas for using Facebook for realtors is by looking at other pages. Look for agents and brokers who are active on their Facebook pages, and take note of the things you like and dislike about their strategy. Here are a few real estate Facebook page examples for you to start.
David Sattelmeyer, Real Estate Agent

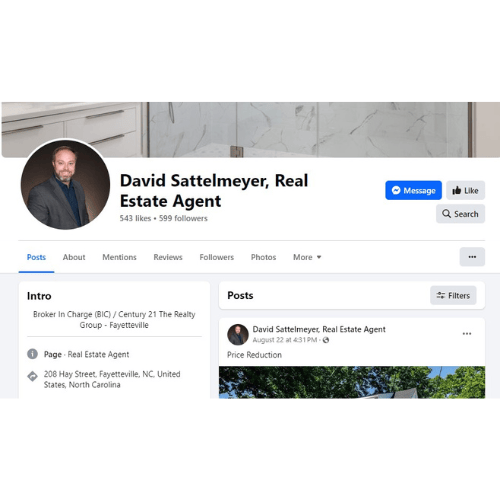

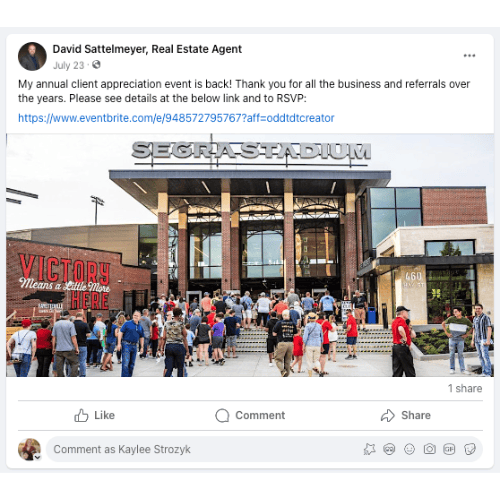
On the surface, this real estate Facebook page doesn’t stand out with funny or trending videos or complicated real estate hashtags. However, this broker is very active on his page and shares all his listing updates and the events he hosts. He doesn’t spend time writing detailed captions, but anyone visiting his page can see that he is an active agent who knows how to get deals for his clients.
The Deanna Kory Team

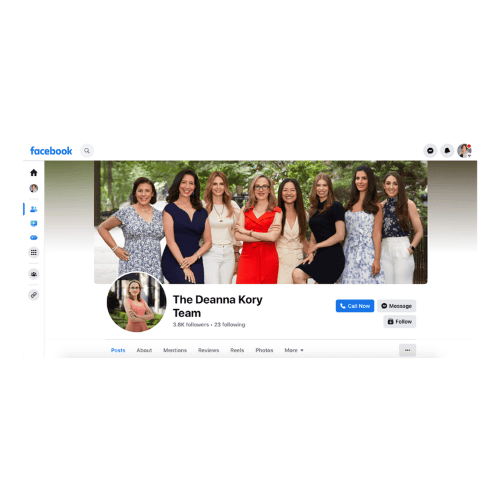

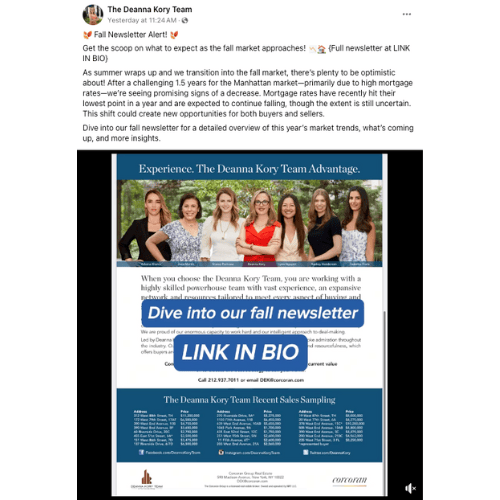
This is the Facebook page of a full team instead of a single agent. They share a variety of types of content, from a “Monday Market Minute” with a video update from the team lead, a market report newsletter, property walkthroughs, and even open house flyers.
Live Dallas Apartment Locators

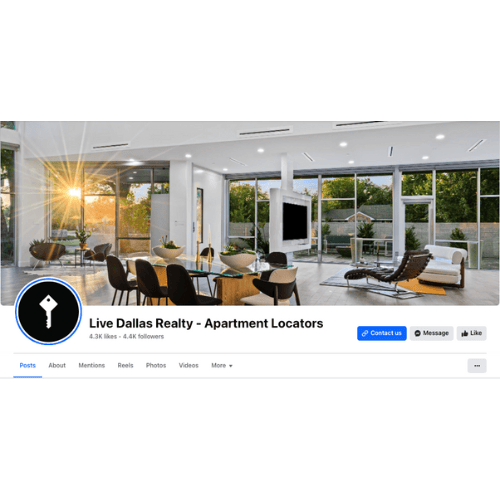

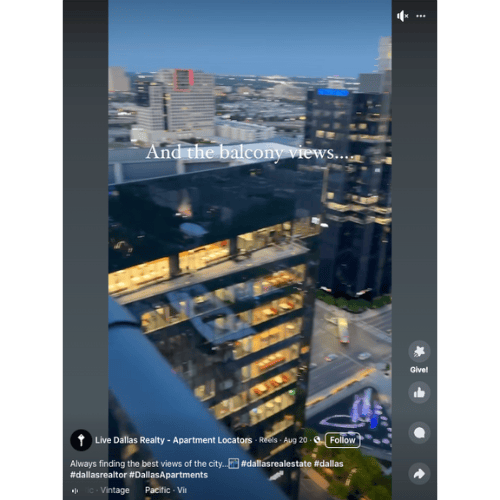
Live Dallas Realty is a real estate team specializing in finding apartments for clients. Their Facebook page name, cover photo, and logo make it really easy for viewers to immediately understand their niche. This team also has a strong posting strategy that consists of listing photos, reels, articles about apartments, and posts from other local businesses.
Frequently Asked Questions (FAQs)
Creating a realtor page on Facebook is straightforward. Our article takes you through the exact steps to make an account, and the Facebook platform prompts you to complete your profile.
One of the great things about Facebook for real estate agents is that it is highly versatile and can be used in a million different ways to boost their business. All agents should ensure their page is complete and well-optimized with business details and automation and consistently post new content. However, content can vary drastically from reels, long-form videos, text posts, market reports, new listings, and even memes.
Start by ensuring your Facebook page is complete and well-optimized, with a CTA button and contact information. To introduce yourself as an agent, create a post with an image or video and a few details about who you are and the audience you serve.
Bringing It All Together
Using Facebook for realtors is important because it’s the most popular real estate platform. No matter your real estate niche, your audience will likely be on Facebook. Plus, Meta offers many resources and ways to promote your content and business page. By following the steps in this guide, you can create a strong Facebook realtor page that can be a valuable tool in growing your business.